The Portfolio of Kaiser Islam
Transportation Engineering
Summary
This section outlines the skills I developed in Aimsun Next 22 to create and analyze a micro model consisting of several intersections. Throughout this process, I learned how to create signal groups, set up OD matrices, implement control plans and create traffic incidents among other topics.
Reflections and the Importance of Transportation Modelling in the Civil Engineering Industry
I learned about Aimsun through CIV332 in third year at UofT, and it was an important introduction to the practical applications of transportation engineering. Through this project, I am now familiar with how concepts learned in my transportation courses can be applied to real life simulation. This project also furthered my interest in discovering how software can be used to optimize daily activities, such as transportation. As technology continues to evolve, it is important that softwares like Aimsun Next 22 are developed so that they can help improve quality of life.
Setting up the Model
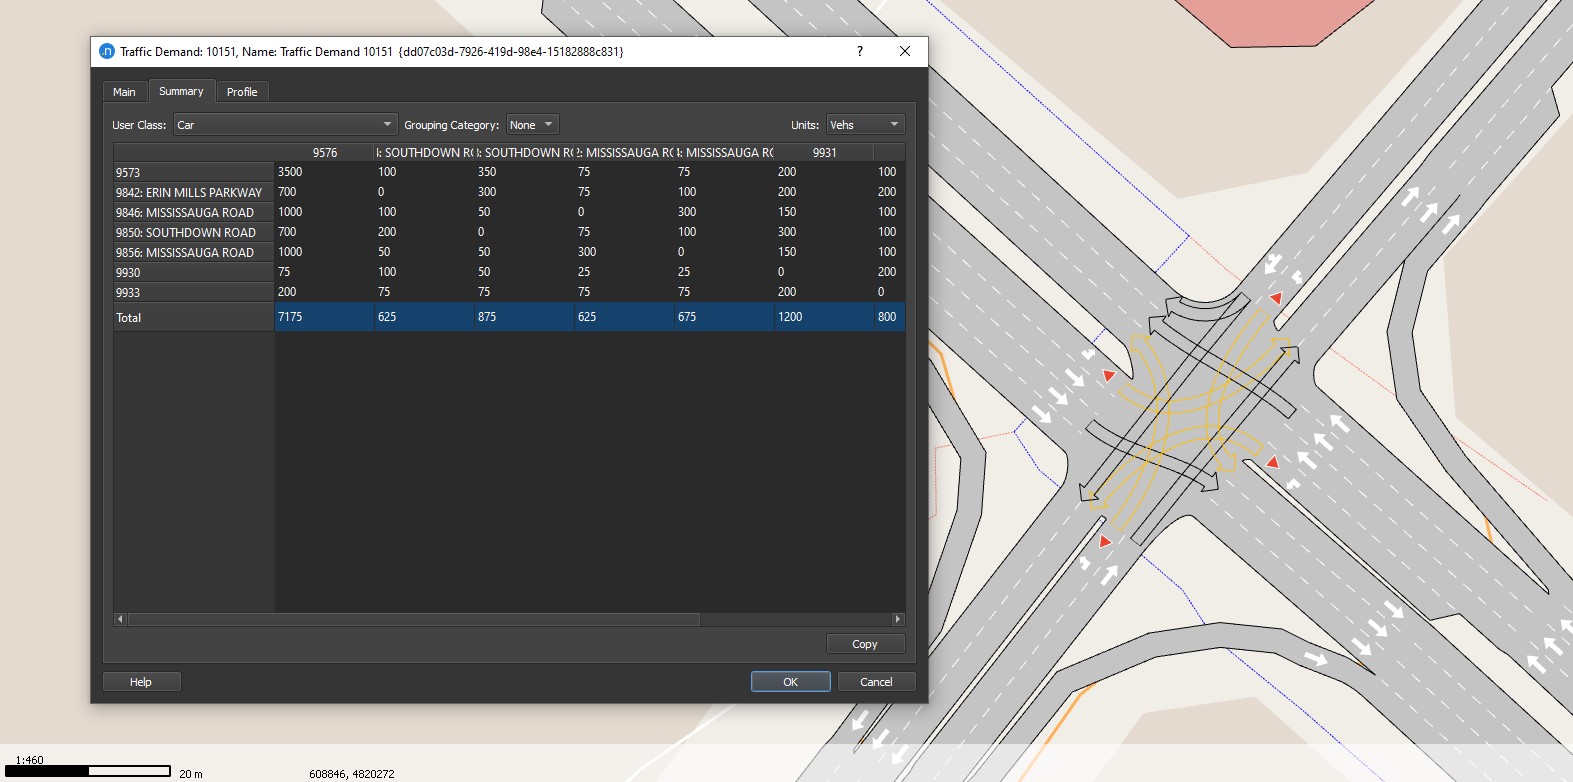 To begin with, we were provided with a half finished model and had to extend various roads and connect them at different intersections to complete it. Once this was completed, it was time to set all of the parameters for the simulations. As can be seen on the left, we had to set up an origin-destination (OD) matrix to define all of the flows in the system. Once this was completed, we had to create a basic control plan and set that as the master control plan for the entire system. After this was done,
preliminary signal groups and signal timings were added.Signal groups were added based on how the intersections are set up in real life. Signal timings were added to initially set up the control plan from earlier; these timings will change once we design the traffic lights (See "Traffic Signal Control" below). The very final step of setting up the model was to create the centroid connections to ensure that trip generations/attractions were functioning
properly and made sense. Through setting up the model, I learned how to create intersections, set up OD matrices and create signal groups and timings.
To begin with, we were provided with a half finished model and had to extend various roads and connect them at different intersections to complete it. Once this was completed, it was time to set all of the parameters for the simulations. As can be seen on the left, we had to set up an origin-destination (OD) matrix to define all of the flows in the system. Once this was completed, we had to create a basic control plan and set that as the master control plan for the entire system. After this was done,
preliminary signal groups and signal timings were added.Signal groups were added based on how the intersections are set up in real life. Signal timings were added to initially set up the control plan from earlier; these timings will change once we design the traffic lights (See "Traffic Signal Control" below). The very final step of setting up the model was to create the centroid connections to ensure that trip generations/attractions were functioning
properly and made sense. Through setting up the model, I learned how to create intersections, set up OD matrices and create signal groups and timings.
Traffic incidents and shockwave analysis
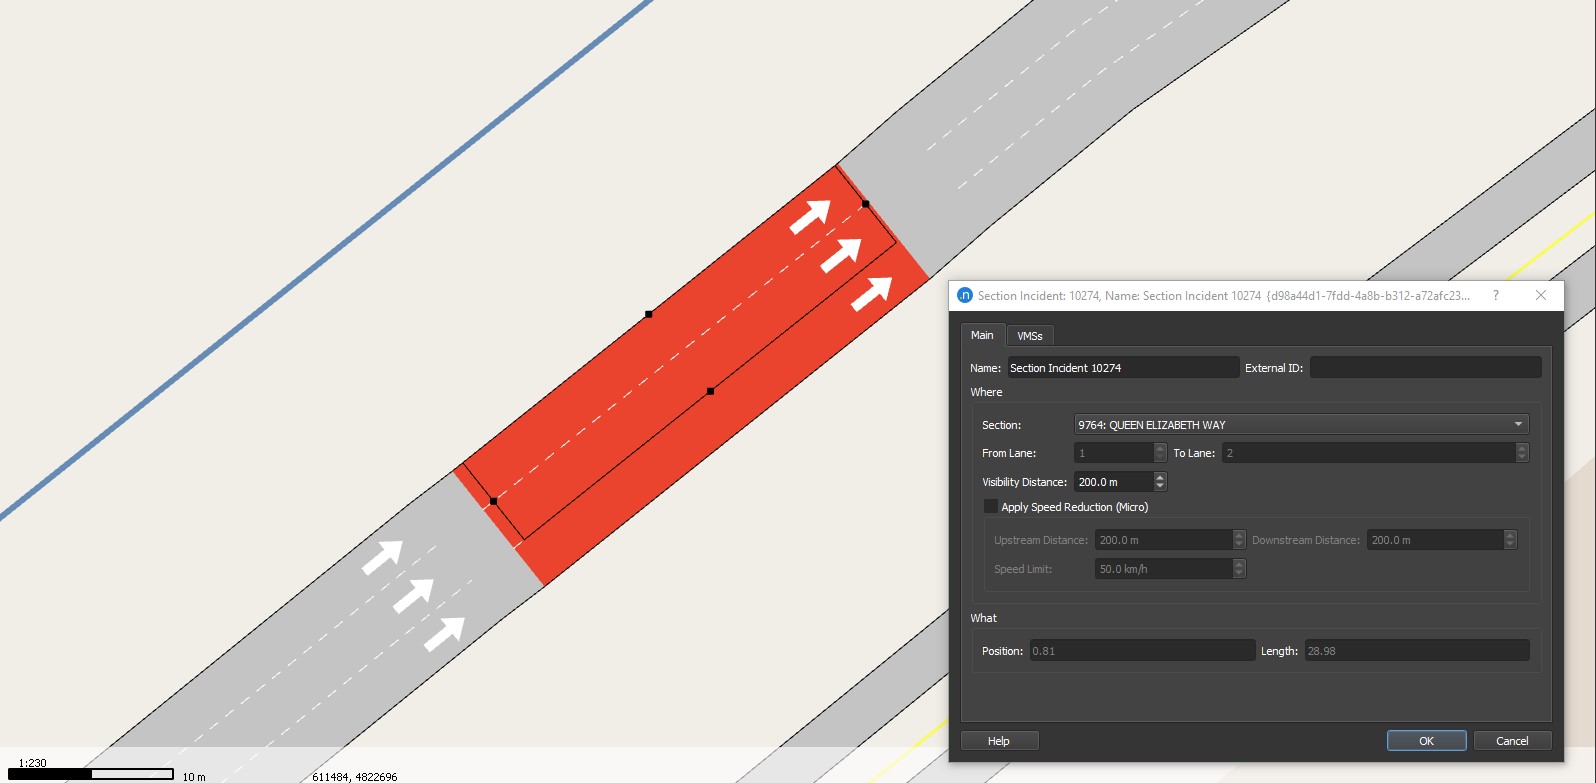 Now that the model is prepared and the intersections have the proper parameters, we can now begin performing different analyses on the system. The first situation to analyze is the presence of a traffic incident causing a shockwave. To set up the incident, a section was created in the middle of one of the highways and a traffic incident was set up, as can be seen on the right. This traffic incident spanned pretty much the length of the section and was defined with a 200.0 m visibility distance. Once the incident was created, a new dynamic scenario was added,
containing the traffic condition as one of the strategies and conditions. After the scenario was created, it was time to see how the accident effected traffic flow; the simulation was ran and we were able to see how congestion backed up upstream of the secion. Using the amount of time required for congestion to reach upstream and the length of the highway segment, we can find the speed of the shockwave propogating backwards. This is only an approximate method however, since it relies on the user visually determining congestion; we must use a mathematical
equation to find a more precise answer. To do so, we can find the graphs of the flow and density before and after the incident. We can find where the flow and density stabilize and use those as the parameters for the accident portion of the shockwave analysis, while the average of the first ten minutes of normal flow and density can be used as the other part of the shockwave analysis. Using these parameters give us a different result than when conducted visually, but a much more accurate one
since we're not relying on human judgement.
Now that the model is prepared and the intersections have the proper parameters, we can now begin performing different analyses on the system. The first situation to analyze is the presence of a traffic incident causing a shockwave. To set up the incident, a section was created in the middle of one of the highways and a traffic incident was set up, as can be seen on the right. This traffic incident spanned pretty much the length of the section and was defined with a 200.0 m visibility distance. Once the incident was created, a new dynamic scenario was added,
containing the traffic condition as one of the strategies and conditions. After the scenario was created, it was time to see how the accident effected traffic flow; the simulation was ran and we were able to see how congestion backed up upstream of the secion. Using the amount of time required for congestion to reach upstream and the length of the highway segment, we can find the speed of the shockwave propogating backwards. This is only an approximate method however, since it relies on the user visually determining congestion; we must use a mathematical
equation to find a more precise answer. To do so, we can find the graphs of the flow and density before and after the incident. We can find where the flow and density stabilize and use those as the parameters for the accident portion of the shockwave analysis, while the average of the first ten minutes of normal flow and density can be used as the other part of the shockwave analysis. Using these parameters give us a different result than when conducted visually, but a much more accurate one
since we're not relying on human judgement.
Traffic Signal Control
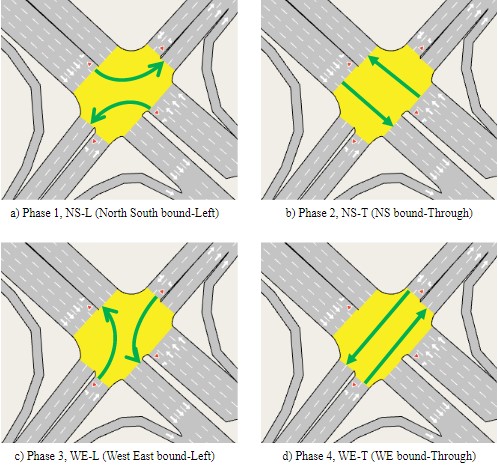 The last main part of this micro model is to create a traffic signal control. As can be seen on the left, one of the intersections from the main model was selected and the following phases were set. Once these phases were set, the 15 minute flow rate was found by running a simulation in Aimsun (separate from the one from the accident) and making the dynamic scenario output statistics in 15 minute intervals. Once this was done, a pretimed traffic signal was designed using the Webster method. To complete this method, we were given preliminary information, including (but not limited to) peak hour factor (PHF), left-turn factor and
saturation flow rate. After completing the Webster method, a signal plan was set up, replacing the preliminary one created earlier. Through this part of the project, I learned how crucial it is to create optimal signal timings to ensure that there is as little delay as possible and to minimize the potential dilemma zone.
The last main part of this micro model is to create a traffic signal control. As can be seen on the left, one of the intersections from the main model was selected and the following phases were set. Once these phases were set, the 15 minute flow rate was found by running a simulation in Aimsun (separate from the one from the accident) and making the dynamic scenario output statistics in 15 minute intervals. Once this was done, a pretimed traffic signal was designed using the Webster method. To complete this method, we were given preliminary information, including (but not limited to) peak hour factor (PHF), left-turn factor and
saturation flow rate. After completing the Webster method, a signal plan was set up, replacing the preliminary one created earlier. Through this part of the project, I learned how crucial it is to create optimal signal timings to ensure that there is as little delay as possible and to minimize the potential dilemma zone.